How to Draw a Human Figure
Step-by-step guide for beginners and advanced artists
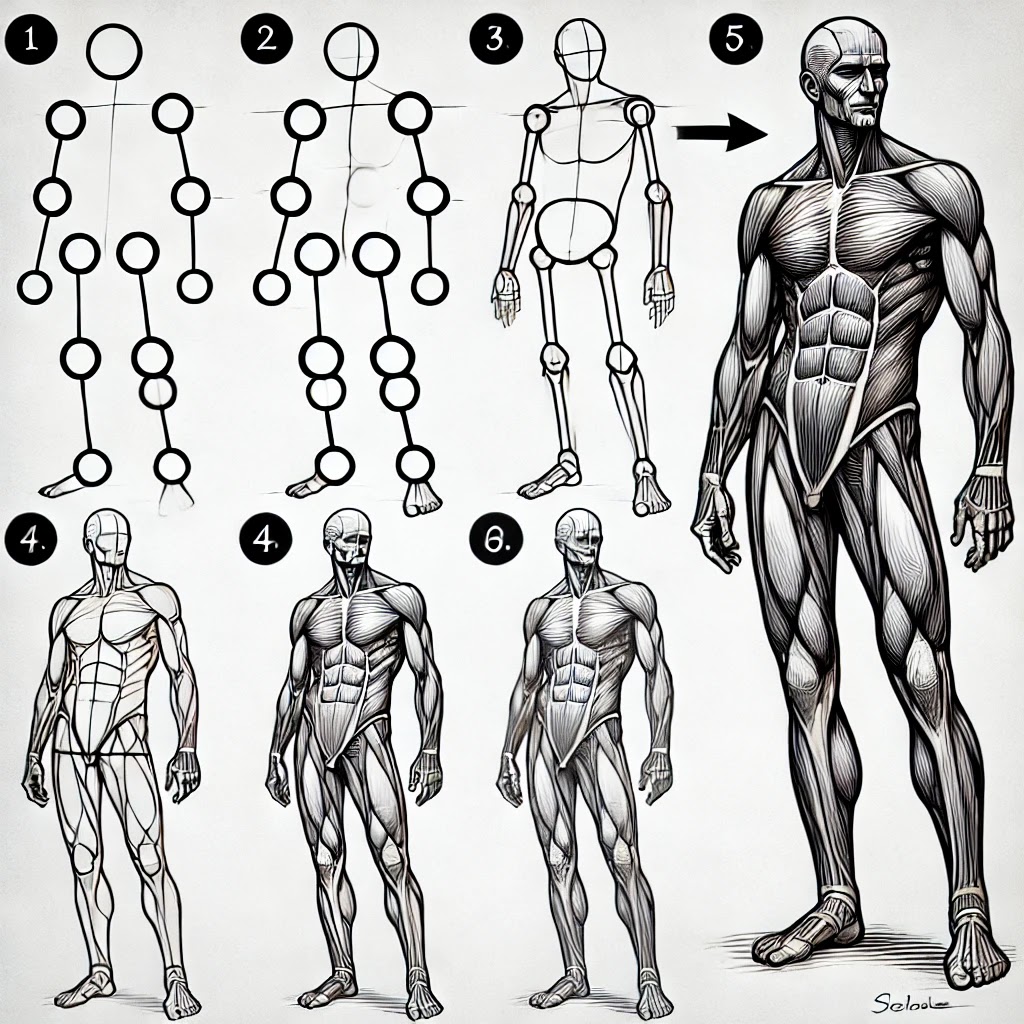
Step 1: Start with Basic Shapes (Stick Figure)
- Begin by sketching a stick figure to establish the pose.
- Draw a circle for the head.
- Use straight lines for the spine, arms, and legs.
- Add small circles for the joints (shoulders, elbows, wrists, hips, knees, and ankles).
- Ensure the figure is balanced to avoid awkward poses.
🔹 Tip: Keep your strokes light; these are just guidelines.
Step 2: Block in the Basic Structure (Mannequin Form)
- Convert the stick figure into simple 3D shapes:
- Head: An oval
- Torso: Two boxes (one for the ribcage, one for the pelvis)
- Limbs: Cylinders for arms and legs
- Adjust proportions based on the 8-head rule (average human height = 8 heads tall).
🔹 Tip: The waist is usually at the halfway point of the body.
Step 3: Define the Proportions and Anatomy
- Sketch contours around the mannequin form to create muscle structure.
- Adjust the limbs for natural flow—avoid stiff, straight lines.
- Use curves for realistic movement, following the body's natural anatomy.
- Refine the hands and feet with simplified shapes (triangles and cylinders).
🔹 Tip: Observe real human poses or use reference images to improve accuracy.
Step 4: Add Details and Features
- Face: Divide the head into halves horizontally and vertically.
- Eyes go on the center horizontal line.
- Nose at the halfway mark between eyes and chin.
- Mouth slightly above the chin.
- Hands & Feet: Break them into geometric forms before detailing fingers/toes.
- Clothing & Hair: Use smooth, flowing lines for natural drapery.
🔹 Tip: Hair follows the skull shape, and clothing folds based on gravity and body movement.
Step 5: Refine the Drawing and Clean Up
- Erase unnecessary construction lines.
- Strengthen the final linework with confident, smooth strokes.
- Add small details, such as muscles, wrinkles, and facial expressions.
🔹 Tip: Use varying line weights (thicker for outlines, thinner for details).
Step 6: Shading & Texture (Advanced)
- Identify a light source and shade accordingly.
- Use hatching, cross-hatching, or smooth shading to add depth.
- Skin texture: Use light blending for smoothness.
- Clothing texture: Use directional strokes to simulate fabric.
🔹 Tip: Soft shadows make a realistic effect; hard shadows create a dramatic look.
Final Thoughts
- Start simple and build up details gradually.
- Use references to improve anatomy and proportions.
- Experiment with different poses and expressions.
- Practice regularly—drawing human figures takes time!

read this other interesting topics


Comments
Post a Comment